Genymotion is a fast Android emulator which comes with pre-configured Android (x86 with OpenGL hardware acceleration) images, great for application testing. The project has evolved from the old AndroidVM and compared to it, Genymotion comes with a new player design, installer and more.
According to its developers, "the product is aimed at replacing the Android Emulator from Google not only for Android developers but also for people making Android apps demonstrations".
Genymotion (currently in beta) is available for Linux, Windows and Mac OS X and requires VirtualBox. The virtual images code is open source (available HERE) however, the software that runs on the host (the "player") is not, but it is free to use. In the future, Genymotion will continue to have a free to use version with many advanced features but there will also be paid versions, "mainly for large companies needing collaboration on Genymotion".
Genymotion features:
- Easily download and run pre-configured virtual images: Android 4.1.1 and 4.2.2 (with x86 support): Nexus 7, Nexus S, Nexus One Jelly Bean, 10.1'', WXGA Tablet, 7.0'' and WSVGA Tablet, all with or without Google Apps (Play Store, etc.);
- Networking: Ethernet (emulates WiFi connection);
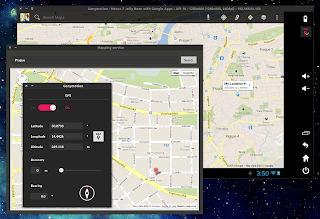
- GPS (with configurable coordinates) and battery (with configurable battery levels) emulation widgets;
- Display: OpenGL hardware acceleration, multiscreen, full screen display;
- Genymotion shell which allows you to interact with your VM using a command line;
- ADB support;
- Eclipse and Android Studio plugins;
- Supports Linux, Windows and Mac.
More sensors are expected in future releases: gyroscope, light, temperature, rotation vector and so on.
Please note that since this is beta software, you might find bugs or incomplete features. In my test, things have worked pretty well: the Internet connection has worked out of the box and I was able to play games like Angry Birds or Fruit Ninja without any lag (but this obviously depends on your hardware):
Here are a few more screenshots:
Genymotion download / usage
Before proceeding, please note that your computer must support hardware virtualization (VTx / AMD-v) to be able to run Genymotion images. Update: this may no longer be required with the latest Genymotion 1.2.1, but I can't test it since my computer supports hardware virtualization.
1. To use Genymotion, you need to install Oracle VirtualBox (Ubuntu installation instructions) - I've tested it with Oracle VirtualBox 4.2.16 and apparently, there are some issues with older versions so you should upgrade to the latest stable release.
2. The next step is to download Genymotion. To be able to download it, you need to sign up for an account (free) @ https://cloud.genymotion.com . After you create an account, download Genymotion in your home directory.
Arch Linux users can install Genymotion via AUR.
3. Now let's install Genymotion. For this, we'll need to mark the downloaded bin file as executable and run it (the commands below assume you've downloaded Genymotion in your home folder):
32bit:
cd
chmod +x genymotion-1.2.1_x86.bin
./genymotion-1.2.1_x86.bincd
chmod +x genymotion-1.2.1_x64.bin
./genymotion-1.2.1_x64.binThe installer will then ask you if you want to proceed - enter "y" (without the quotes), press ENTER and that's it, Genymotion should now be installed on your system.
4. If you've followed our instructions above, Genymotion should be installed under ~/genymotion so to run it, use the following command:
~/genymotion/genymotionGenymotion should now start. To add a new virtual device, click "Add", log in with your Genymotion username and password (created under step 2) and you should see a list of available devices:
Select the virtual device you want to download from the list and click "Add" (to be able to install applications via Google Play Store, make sure the machine name mentions "Google Apps"):
Once you click "Next", the download should begin. Click "Next" when the download completes, enter a name for your new virtual device and click the "Create" button, then "Finish". The device should then show up in the main Genymotion window. Using the buttons on the right (or right clicking the device), you can change the screen size or delete the device:
To start a device, select it and click the "Play" button. In the same way, you can create and run more devices.
From the Genymotion menu you can set the ADB path or enter a proxy to use with Genymotion. In my test, Genymotion displayed an "Unable to find ADB in this path" message even though my ADB path was correct - hopefully this bug will be fixed soon. Once you start a virtual machine, you can connect via ADB by using the default VM IP: 192.168.56.101 (this can be configured from the virtual machine, via Genymotion Configuration, available in the Android VM apps list).
via lffl.org


0 comments:
Post a Comment